Showing posts with label Tutorial. Show all posts

Monday, 2 March 2015

Happy Birthday Dr Seuss!

I missed the opportunity to make a 'One Fish, Two Fish' lunch for Miss M when they read the book a few weeks ago, so I have been determined not to miss Dr Seuss' birthday. When I was explaining to Miss M whose birthday it was and we looked at her books she said 'the Cat books'. I went with that!


I tried to make jelly directly into our Easy Lunchboxes, but I'd already set aside some of the liquid for my back up plan and forgot to take that into account when measuring out the water to be added. Oops! At least I had a back up :-)

This was it. Jelly set in a mini container.

With a few sections removed.
Then with a little ingenuity we filled the spaces with yoghurt. Miss M was very excited to help with that part!
I think it looks the part, don't you?


I forgot to add some dip for her apple. When I remembered I thought I'd give that the red & white striped hat treatment too! I've discovered cashew butter which is accepted at our school as well as Nutella. Today I added some plum jam too.

I found this cute idea for the cheese stick and just had to try. The link goes to a private blog, sorry, but I do want to give credit. Brain break is her favourite pepperoni & cheese with crackers. Just arranged slightly differently  :-)

Some cheaty cheese art atop her plain Vegemite sandwich adorned with a bow food pick and some fruit leather (roll ups) complete this lunch.

I've been asked a few times about cheese art, so I finally made up a tutorial. This technique is based on one I learned from Robot Squirrel & the Monkeys and I really tend never to stray too far from this now.

Select your image and reverse it if need be. There have been times when I've let the finished product be the mirror reverse, or I've traced with pen from my computer screen, flipped over the paper and traced from there. I like that the computer acts as a little light box and I can easily resize to suit simply by zooming in & out.

You can trace in whatever colour you choose, you can also colour in at this stage, but you do have to move quickly before the 'ink' dries.

Line up your cheese, press & rub firmly. Depending on your image sometimes I find it easier to place the cheese onto the image rather than the other way around.

Once you're happy the image has transferred, gently peel back the baking paper to reveal your work of art! You can add more detail directly onto the cheese or if some of the lines need touching up you can do this now. Be warned - once you start touching up lines your image may look uneven. It's up to you whether you continue to touch up or let it go. I tend not to touch up too much any more.

I have found that the 'floppy' plastic covered cheese works best with this technique rather than sliced block cheese.

What do you think? Will you be giving cheese art a go? I'd love to hear about it if you do! Comment below or send me a photo on Facebook!


Details of my tools & toys can be found on this page.

~J

Disclosure: This is not a sponsored post. This post was written for Loving Lunches. No product was received for this post. All opinions expressed are my own, based on my personal experience with the product. This post may contain affiliate links.

Wednesday, 10 December 2014

Sweet Potato Quinoa Apple Stuffing Balls

What else is there to say? The simple little yummies are just that. Simple. . .little. . .yummy. Perhaps they wouldn't have been quite so simple had I included all the ingredients I'd intended, but that's another story!

The original recipe called for nuts which meant this wouldn't have been able to go to Kindy. Thank you to Kendra at Biting the Hand that Feeds You for the suggestion of sunflower seeds! I had bought them. . . and laid them out. . . and then completely forgot to add them in *sigh*. I also forgot to rinse the quinoa like Kendra suggested which might explain the slight bitterness of these. Unfortunately it turned off Miss M & Mr Loving. Looks like it's back to his Quinoa Stroganoff - no arguments here! Back to the task at hand. . .

I took inspiration from our #52NewFoods Cookbook and combined 1 part roasted apple, 1 part roasted sweet potato and 2 parts basic quinoa in a bowl. Pressed the mix into a silicon cake-pop mould and let it set in the fridge. Later I rolled the balls in bread crumbs. Next time I think I'll cut the roasting ingredients smaller, or puree them before mixing. And I'll also include some crunch. Those sunflower seeds I forgot :-(. What do I love most about these? Leftovers! We had roast pork with roasted vegetables and apple. Easy enough to add a few extras and then the second night we served with quinoa instead of potatoes. How simple is that?

I made these for our Teacher Gift this year, which you can see in this previous post. That cute little box is from Daiso.

Details of my tools & toys can be found on this page.

~J

Disclosure: This is not a sponsored post. This post was written for Loving Lunches & 52 New Foods Challenge who generously provided me with a copy of their book. All opinions expressed are my own, based on my personal experience with the product. This post may contain affiliate links.

Wednesday, 11 June 2014

Introducing Solids Part Four - But How. . .? (and What to Eat Dice Game)

Over the last few weeks I've been sharing my thoughts about introducing solids. Here are the links to Part One, Part Two and Part Three.

One of the hardest things I found when I first started introducing solids to Miss M was deciding what to introduce & when. The 'rules' have relaxed a lot since then, so now you just have to decide where you want to start. Iron rich foods & veges get my vote.


It took some practice, but I finally got a system down with Miss M where I'd cook every three days for her. I'd make 6 Take & Toss bowls of veges that would serve as her lunch & dinner. I would generally create a 'rainbow' from seasonal vegetables, trying to introduce one new flavour every three days. Depending on how she was going (she's always been a big eater though) I'd peel & chop into large chip or wedge sized pieces five roughly fist sized vegetables. Then I'd pop them in a covered microwave dish (I love my Tupperware stack cooker for this) and zap with a little water for five minutes. Depending on the selection it may need a little more, but most times this was enough to cook them through. Those five I'd try to 'count a colour' - red, orange, yellow, green, white/blue/black/purple.

For breakfast each day it was overnight porridge with fruit puree. Snacks would be fruit, cheese and yoghurt. She'd also get yoghurt for 'dessert' most nights as she wasn't much of a milk drinker & I was concerned about her dairy intake. Mind you, I ended up mixing her dinner veges with the yoghurt to get her to eat them most nights. apparently pumpkin and yoghurt tastes great to a baby!


Then Honey came along and even though I'd intended to follow much the same route I quite simply haven't. The vast majority of her meals are variations on what we are having, even if that means I plan a few of our meals around hers. The early days were really easy. I'd save and reduce some of the water used to boil our vegetables and add that to her rice cereal each day.


 As she progressed through the textures I would simply mash the vegetables we were having and I'd freeze some in an ice cube tray.


This is how one of our typical family meals would be served to Miss M. I hope you can imagine a grown up version because I didn't photograph it :-). I will share a few of our 'three in one' meals as soon as I remember to take photos of them.

Now Honey is eating mostly what everyone else is, only I need she prefers to self feed so dishes like good old Spaghetti Bolognese can end quite messy. Breakfast most days is porridge with frozen fruit puree. Lunch is generally leftovers, and dinner is the family meal. I would share our meal plan only I've gotten quite slack and haven't done one for ages!

This is an excerpt from the current 'Eating for Children' brochure found here. The toddler (ages 1-2) recommended intake can be found here. The Eat for Health website is a great resource.

[EDIT] I forgot to add this photo to the original post - oops! This is a sample of what a full day's worth of food looks like for a Eat for Health 1-2 year old. 2 slices of bread, 1/2 cup cooked porridge, 1/2 cup cooked pasta, 1 1/2 cups cooked coloured vegetables, 2 large eggs, 1 kiwi fruit, 40g cheese.


What to eat dice game
For something a little different, here's a little dice game for you. Each square contains a suggestion for one recommended serving of that food group. Simply roll your dice for your number of recommended serving, and feel free to chop & change the results. I took these from the brochure above, but you can easily substitute your own. I have a few versions of this I've been toying with for the past few years, would you like to see some more?

Details of my tools & toys can be found on this page.
~J

Disclosure: This is not a sponsored post. This post was written for Loving Lunches. No product was received for this post. All opinions expressed are my own, based on personal experience with the product.

Wednesday, 4 June 2014

Introducing Solids Part Three - Tools of the Trade


Who would have thought that such a tiny creature would create so much . . . 'stuff'! Recently I've been sharing my thoughts and research about introducing solids as our little Honey makes her way into the wonderful world of food. Here's the links for part one and part two for you.


Of course you don't actually need all this stuff. Admittedly some of it can make life an awful lot easier, but remember that people have been raising babies for quite some time now, and it's not like the cavemen had all the wonders that are the mountain of spoons you seem to accumulate :-)


And seeing as these are the most fun, let's start with the spoons shall we?
Your easily recognisable teaspoons. The one on the left is a kiddies spoon from Ikea, but I notice that style around a lot lately. In the centre is a 'real' baby spoon in that is came from a baby cutlery set. There's nothing wrong with using teaspoons. I just found in the early days when we were both still learning how to do this whole feeding thing that we had a few misjudgements and hard metal on soft gums doesn't really make for happy campers. Also you can fit quite a lot of food on a teaspoon, and trying to fit that into a tiny baby mouth does correspond to the whole feeding an octopus swinging from the ceiling comparison you've heard about.

Also stock standard spoons, this time disposable, picked up from here there & everywhere and always floating in the bottom of my handbag these days. While they are handy to have . . . on hand, they can be a little sharp for soft little gums. Good if you're in a bind, but not to be relied on. My favourite is the mini gelato tasting spoon in the centre - and not just because it meant I got to eat gelato :-)

Ahh. . .baby spoons! With Miss M I only had the Nuby ones on the left. They have a lovely long handle and small but deep head. They are thick and soft to the touch. I used them to start with Honey too but we've moved on since I now had a few more options. They also change colour with heat, but they are somewhat discoloured now so I'm not sure how reliable that function currently is :-)
The pink/purple spoon is from Tommee Tippee and while we use it on occasion it isn't one of my favourites. I find the head too long and the handle slightly awkward. No idea how that works, but that how it feels. Perhaps it will come into it's own when Honey starts to feed herself from the spoon.
In the centre is a Heinz number which is really quite good. The head tapers from relatively thick at the base to fairly thin at the nose, which means you can really scrape down the side of your bowl with some ease. I quite like this one!
The orange is one of a pack of Take & Toss spoons that came in a gift basket when Honey arrived. These are now my go to spoons. Partly because there are so many of them, and partly because they are a decent design. They are hard so I wasn't comfortable using them when Honey was smaller, but she's almost 10 months old now (where has the time gone?!?!?) and she does quite well with them.
The little red one is from Heinz and is designed to complement food pouches. I must admit I'm not a fan as it loads the food through a *very* small hole at the back of the spoon and I prefer to feed off the front of the spoon - does that make sense?

This lot is the not necessarily spoon collection. 
There were two Sinchies bags there but Honey stole one just as I took the photo. These food pouches are great. You can read my original review here. As an added testament I liked them so much I bought more for this school year. For babies though, they open a world of self feeding for purees or semi-liquid foods (think soups and yoghurts). The spout is wide enough that you can suck out smoothies, but small enough that even if it is squeezed, you're not going to end up with half the mess you would had it been a bowl knocked over. Not to mention these guys are clear so you can easily see how much is left, or whether they're in need of a clean in the corners. I know that moving through the textures is a big thing with introducing solids, but yoghurt pretty well only comes in one texture, and this way baby can self feed, giving you a hand free to feed yourself!
The food net at the top is a Tommee Tippee that I bought to replace our old Munchkin Fresh Food Feeder. I didn't use it much with Miss M as the net was hard to clean and always smelt odd. The new Tommee Tippee one comes with two spare nets and a cover! So much better. I've used it a bit with Honey. Early on for stuffing full of whatever we were eating (mostly veg), this comes in particularly handy if you are out & about or travelling. You can generally pick up a roast meal most places and it's so easy to pop a few veges in the feeder for them. I've also used it as an 'ice block' holder for those really hot days we had over summer. They are a great way to introduce foods that would normally require a bit of work (like meat), but they don't allow baby to explore the textures too much. If you're considering one of these do go for one with replaceable nets and a cover. Don't leave it too late as there is a limited time they will last once teeth come in.

Oh, and they all make really good play things when Mum's not looking too :-)

Bottles and sippies and straw cups - oh my!

This is just a selection of our hoard. My girls have seemed to go for the straw cups rather than spouts.  I must admit I'm liking our Avent Grown Up Cup at the moment, but it can get a little messy so it's our dinner time cup. You can just see it on the top right - the red lid. I love that the lid keeps the flies off during the day and it also encourages that normal drinking action without spilling too much. I'm not sure I'd be comfortable with it floating around in my handbag though.
Our Brother Max trainer cup has been a bit of a let down to date. The handles have been great, but Honey just hasn't gone for the teat. Perhaps when we update to the cup lip we'll be right. . .perhaps :-) It's the one with the funky looking handles towards the bottom left.
The white zippy with the blue handles along the bottom is an old style Avent bottle. The teat is just to the right. I love that you could easily upgrade your base bottle with this style. I'm not sure if that is still available with the new style released last year. You can see the new style just above the Brother Max. 
The only other major thing to note is the different types of straw you can get. I left the lid of Miss M's orange drink bottle on the top left down, but that one (I think it may be Nuby but the name has worn off) has a thick straw top that requires bub to bite down a little to get any water out. You can get them with a more regular shaped straw which are great for fluid flow, but it can come out a little fast and cause baby to splutter somewhat. Unfortunately it's a trial & error thing, but I prefer the regular style.

Containers! You will want to have something to store baby's food in. Whether it be purees you are prepping ahead and freezing in an ice cube tray (once frozen you can transfer to a ziplock bag), or finger food you are saving from your meal to serve the next day. Here's some of what I've been using.
Ice cube tray - perfect for freezing single serves before storing in a ziplock bag. 
Sinchies pouch - I've already told you how much I love these little guys :-)
Tupperware - because I already had a huge stash anyway :-) I didn't pull out my midgets & smidgets - they are perfect 'shot glass' size but not part of the regular Australian range. I'd recommend checking out eBay if you're interested.
That purple one is a Twistix icy-pole mould which I've used for freezing yoghurts, smoothies, juice, all sorts! Honey has stolen some of my frozen yoghurt & mango from one and I was quite surprised at ow well she handled it. She wouldn't stop eating it though so her poor little lips were a bit red after from the cold. Lesson learned - hide frozen yummies from the baby unless you want to share!
I love love love my Take & Toss containers. I bought a six pack of the large when Miss M was starting to progress through to finger foods. They are the right size to hold a few serves of veg cut into good 'chip' sizes. When she grew up a bit I bought the small snack containers and the tall cups. I love that the lids on those two are interchangeable. I can serve a small drink  and a large snack, happy days!

Plates!!
For the early days I could't go past my little gelato and airline bowls. Perfect for the small amount you need, reheatable, and drop safe! Of course you could use some of the Take & Toss snack containers because they come with lids too, but anything uneaten really should be tossed for safety reasons.
I've only just started using a divided plate. It comes in handy to remind me I don't need to fill the whole plate. It's also handy to keep partially eaten bits separate from the 'good' food. Only problem with this one is it's melamine which is not microwave safe.
The Tupperware handled bowl there is though. It also has a lid and holds a decent amount. Miss M used to eat a full adult serve of oats for breakfast, but wasn't too keen on waiting for them to cool down, so I took to preparing them the night before & letting them 'soak' overnight. In the morning I would just give them a little zap to warm them through a touch.
Those flat plates you can see (yellow & blue) are from Ikea and are microwave safe too. Great size for sandwiches & because they are drop safe we use them constantly! And not just for the little ones. I've been known to heat a pie (or two) on them for my own lunch form time to time.
That leaves our Bunnykins bowl. This is a brilliant baby bowl as it's quite heavy (harder to knock over - not impossible, but harder) and you can pop it in the microwave (perfect for heating leftovers). It is breakable though, which is why I invested in one of these guys.

I've never been able to get it to stick to plastic plates well, but our Bunnykins it works famously with.

Ok, this one isn't really food related, but while we're in the kitchen I thought I'd share this tip from Mothers Group - use link toys as cupboard child-proofing. They can still pull the doors so fingers can get caught and if you have mountains stacked in there (like Tupperware) some can still fall out, but it can be a deterrent.

Wow! Another post longer than I'd planned. Let's see how we go for next week & line up a 'yeah, but *how*' post. Please feel free to leave a comment below or on Facebook. I love hearing your feedback and questions! Let me leave you with a few happy snaps :-)


Have you entered our latest giveaway? Details in this post.


Details of my tools & toys can be found on this page.
~J

Disclosure: This is not a sponsored post. This post was written for Loving Lunches. No product was received for this post. All opinions expressed are my own, based on personal experience with the product.

Saturday, 24 May 2014

Introducing Solids Part Two

Last week I shared my go to resources and links for introducing solids. I had a great response to the post and have had some fantastic enquiries and inspirations for more pieces. Stay tuned!

Following on from that post, here's some questions and answers. Most of these were questions I had myself and was able to find most of my answers through our wonderful Birthing and Babies classes thanks to the local branch of the Maternity Coalition.

Before hitting the publish button I realised how much is in this post -it's huge! And as a mum I know there is so much to read and many written resources out there, but what I really wanted was for someone to *just tell me*. So I think I've worked out how to record my answers and if I've appeased the gremlins you should be able to play back each section.

Again let me start by saying I am *not* a nutritionist, dietitian, nurse, speech pathologist or any other type of medical professional. I am a mum. Please speak with your GP, child health nurse, or relevant health care professional to find out what information is current and specific for your individual needs.

When do you start?
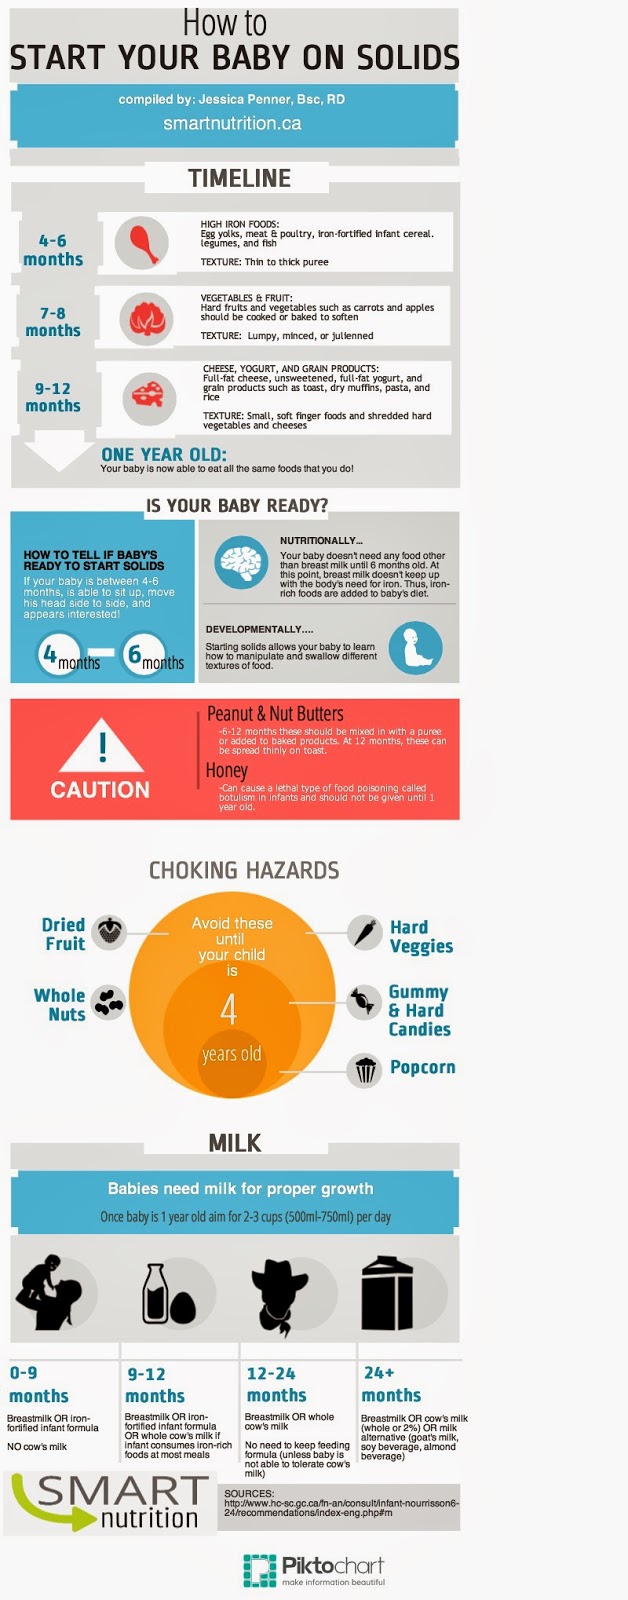
(click on image for source)
Each baby is different and will be ready when they are ready. There are many signs to look out for - and wouldn't you know it someone has created a fabulous info graphic for it too! This one comes from Smart Nutrition blog in Canada so some of the info is a little different to what the current advice is in Australia, but you get the jist.
Nutritionally speaking, your baby doesn't need anything other than mother's milk (literally or formatively - I'm not getting into a thing about that here) until *around* 6 months. This is when their stores of iron start to deplete and the sleepless nights are taking their toll on mum they are growing at such a rate that they may need a little extra.
Developmentally speaking your bubba needs to be able to sit unsupported for the length of time it takes them to eat. I'm talking sitting by themselves, not propped up in a highchair or Bumbo. They need that strength in their core so their digestive system can do what it needs to, to get the job done - so to speak. Once you are satisfied they can sit for that time (ten minutes maybe?) strap them into a chair! You don't want to be trying to feed baby while they can escape. Your bub needs good head & neck control - that food's got to get to their belly in a relatively straight line :-) They also need to show an interest in eating. This generally manifests itself by baby stealing your food and shovelling it into their mouths. One of the signs which I found harder to spot was when the tongue thrust reflex weakens - basically when they don't spit out everything you put in is a good sign it's subsided.


(click on image for source)
What do you feed them?
Again, each to their own, but the current advice is that so long as you introduce iron rich food first you can pretty well do whatever you like. Try for vegetables, fruit and wholegrain cereals followed by some dairy. Dairy by the way only counts if it is milk, yoghurt or cheese. Those 'dairy snacks' in the supermarket don't count. And custard doesn't count either! The only foods you need to hold off on are honey (until 12 months due to botulism risk), milk (as a stand alone drink until 12 months) and any choking hazards (whole grapes, stringy foods like bean shoots, hard nuts or seeds etc) If you have allergies or intolerances you are wary of, please speak to your health care professional as you will have to pay extra attention to a few details.
So what did you do?
With Miss M I spoke to my child health nurse at 5 months (because she was stealing my sandwiches!) and she advised me to start on rice cereal. I did the same with Honey, although by that stage she had already munched on teething rusks, a pizza crust, nibbled on some lemon curd tart and snuck some of my chocolate - shhh! don't tell! So at 5 months the girls had one meal a day of rice cereal. Most people suggest breakfast, but I chose lunch - it suited our routine better and we could be relaxed and take our time with it.  The rice cereal was mixed with either breast milk, formula, cooled boiled water, cows milk or vegetable water. At 6 months we officially introduced them to 'real food' starting with vegetables. With Miss M it was pumpkin first, Honey had sweet potato (that pizza doesn't count, remember ^-^)We started with veges, then fruit and added some meat when they were up to being able to handle minced meat texture. I used the seasons, a rainbow, and store bought food as a 'flavour guide'. I picked one or two readily available commercial baby food combinations and introduced those foods first. I figured that way if we ever got 'stuck' away from home I could always feed them something in confidence it wouldn't have any negative affects. This is such a huge topic, I might come back and do a whole post on it. (Please let me know if you want more of this or not)
[EDIT: I found an app! It's free, and it's a start to get you thinking about eating a rainbow. Goodee Rainbow Food Journal Lite]


How much?
How long is a piece of string? Like everybody your baby will have hungry days and not so hungry days. They will have favourite foods and ones they aren't keen on. I know that the advice says that a baby will not over eat (they stop when they are no longer hungry), but I don't think anyone has told my two that! Especially Honey. I can offer her breakfast, say porridge with fruit, thickened with rice cereal. She'll have a good go at it, break for a drink and go again. Once we've done the 'are you done, do you want more' dance with food and water I would normally 'wash' her and her high chair down, pop her on the floor and clear away. Unless of course I'm still eating, in which case I will often give her a crust of my toast, or a few pieces of Little Bellies cereal. *And. She. Eats. Them* Don't tell me she'll stop when she's full - she'll stop when her porridge belly is full and then want what I'm having! That's not supposed to start yet!
Back on track - oops! Start out with a teaspoon or so of solids. See how that goes. Those very early days are all about getting the idea of something other than straight fluid. Gradually increase as your baby's appetite grows. When they turn away, push food away, look distracted & not interested, they've had enough. If they're lunging at you and bouncing up & down like a wild thing every time they see the spoon you could probably give them some more :-)
Here's a link for suggested intake for a 1-3 year old. The up to date information can be found in your Queensland Health Red Book.


How do you feed them?
Again, it's up to you. There are many different ways and many different theories about parent led vs baby led weaning. For me, in those early days spoon feeding rice cereal while baby is locked into a Bumbo, preferably on a verandah or easily hosed off surface, made the most sense. As they progressed through textures and foods our tools changed too. From changing the spoon/s we used to introducing food pouches and finally finger foods. One thing that it took me a while to learn is to eat when the baby's eating! They watch you and it's much easier to show them how to chew food if you have some in your mouth (gross, I know, and I hate chewing with my mouth open - ugh! but it works). And you need nutrition too! Also don't forget to offer water with each 'meal'. One of the leading causes (in my opinion) of constipation around the time of introducing solids is the lack of fluids to . . . well. . . keep things subtle, shall we say.
I found preparing a tray for lunch the easiest option. A muffin tin would also work well. You will need: water for you, water for baby; something to eat for you (with utensils if need be), something to eat for baby (and your chosen utensil/s), bib, and a damp cloth. Honey is somewhat of an independent soul and is quite fond of doing things for herself. Hence my three spoons for this lunch. One for each of her busy little hands and one for me to wield. Oh, and don't think I only get to wield the one either, they all get chopped and changed during the meal :-)
In an attempt to contain the mess feel free to lay down a 'splat mat' - a table cloth or shower curtain work wonders! And so much easier to then hang on the line & hose off after
I'm in the process of taking photos of all of the feeding equipment I've accumulated & will post a 'tools of the trade' soon - children & flu permitting. I'll also do up some of our 'one-cook, three ways' meals.

(click on image for source)
How do you introduce new foods or flavours?
If you have no concerns about intolerances or allergies, you can simply go for it and see how your little one reacts. Generally speaking if you want to be cautious, or if you think there might be something awry and you want to narrow your suspects, try one new food every three days. For example, you start baby on rice cereal mixed with their favourite milk (breast or formula). If after three days everyone's happy you can add a new flavour, say pumpkin. Try for three days, and if all's well add another. Let's say potato this time. Three days later you can add a third. I'm going to go against my rainbow and stick with conventional carrot. You now have multiple options for mix and match meals. You can have any of these ingredients as stand alones, or any combination. Don't forget you also have water in the mix too if you are wanting to thin out any of your purees. And if you want to get tricky you can save and reduce your vegetable cooking water to add to your rice cereal for an added nutritional boost and a different flavour to boot. This is particularly handy if you are breast feeding and are not all that successful with expressing - speaking from personal experience.
Rememebr that baby's taste buds are very pure and haven't had years of coffee and salt bombarding them. Anything you think tastes bland will probably be the most exciting thing they've tasted! Anything you think tastes a little spicy/hot will most likely blow their minds, so be mindful of flavour enhancers.

(click image for source)
What sort of negative reactions should you look out for?
Apart from anaphylaxis which I've been fortunate enough not to encounter (touch wood), you may notice a change in diaper/nappy changes (both frequency and 'intensity'); rashes; hives; general dissatisfaction. Choking or gagging. Sad realisation that your baby is growing up and is one step closer to your Tim Tam stash.
And what can you do about them?
If you suspect an allergic reaction or anaphylaxis; shortening of breath or swollen airways, stop everything & call 000.
If the reaction is mild and you have a fair idea of what's caused it, you can experiment by removing the offending food for a few days and let things return to 'normal'. Then in a controlled way introduce it again to see if the reaction is the same. Not all reactions/intolerances are permanent. Miss M would break out in a facial rash when she ate strawberries early on. By the time she was 12 months old she had out grown it.
Intolerances are harder to identify and you may find you need intense dietary investigation. Speak to your health care professional for more information.
For constipation ensure baby has access to plenty of fluid and has a fibre rich diet. Some things which may help include pears and prunes. You shouldn't be administering anything as a preventative, although I would always serve bananas and pears together just to even the playing field. If the problem is ongoing, seek medical advice. Don't forget the 13HEALTH number too. You can speak to a child health nurse any time of the day or night.
The ties that bind. . .
Different foods do it for different people. Some foods that I've noticed can have a binding reaction include: bandanna (yes, really), potato, avocado, eggplant, blueberries, too much rice (rice cereal for breakfast, rice cakes for snack, rice-rice with dinner - oops!)

(click image for source & great article from Active Mama)
How do you progress through the textures, and when should they be doing that?
Like anything new it's best to start with something familiar. Very first foods should be similar in consistency to breast milk. Awkward for trying to spoon feed I assure you, so it won't take long for *you* to be increasing the consistency to something a little easier to handle. You may find a drier mix of rice cereal easier for bub too, so they can learn to use their tongue and roll it around their mouths. They'll also like to get their fingers in there and feel what you're feeding them. This is a good experience for them, although you may find more food out of their mouth than in. Just remember at this stage breast milk/formula is still their main source of nutrition.
The general run of textures goes: Liquid - thin puree - thick puree/mash - lumpy mash - finger food. My general rule of thumb has been if you can need a spoon it's puree, if you can eat it with a fork it's mash, if you can stab it with a fork it's finger food.
If not earlier, you will most likely find your little one wanting to self feed around 9-12 months old. As messy as this can be, do encourage this behaviour.
If you have any concern about moving through the textures, seek help from your medical professional. Don't forget that speech pathologists, dieticians, and even occupational therapists can offer advice on this matter. It is easier to help early on and there's no harm asking for confirmation if nothing is wrong.


But what about choking. . .?
Unfortunately there's no easy answer. Baby needs to progress through textures so they can develop their oral muscles which are needed to eat, communicate and talk. Your baby has a gag reflex for a reason. There is a difference between gagging & choking, but until you see it in person, nothing can quite prepare you. I was surprised at how quickly I could tell the difference between eating, gagging & choking noises (or lack there of). There's a certain cough/wheez/lack of sound. . . you know how you can hear baby crying & you know they're just ticked off that you're not paying them any attention, and then all of a sudden it changes -there's a pitch or intensity to it that just sets of the mummy alarm, you turn around to find they've caught their fingers in a set of drawers - it's sort of like that. . . only of course you will be nearby and paying close attention when bub is first learning to eat. Keep your eye peeled for those times when bub brings up their choking hazard. It's strange how reassuring it is to see it happen for yourself.
Here's an info sheet from St John Ambulance
Some pictures for quick reference
I tried to find an Australian video to link to but couldn't load the one on the Raising Children Network. Here's one from the UK showing how to perform back blows.
All you can do is trust your baby's reflexes and your own judgement. You know your baby best. Don't forget you can always ask for help! Some tips that may help - give baby a long handled soft spoon to play with. They can use it to find their own gag point. When you move on to finger foods, go for softer foods if you are nervous. Ripe banana, over ripe pear, well cooked pumpkin or sweet potato. Anything you could mash with a spoon to give you an idea of the 'solidness' to look for if you are nervous.


So. . . water. . .?
When you start introducing solids, you should start introducing water too. Boiling water (and letting it cool) before serving it to baby helps to kill off any nasties that might be lurking in the plumbing. It is advised you continue to boil baby's water until 12 months of age. Personally I didn't see much point when they started eating off the floor ;-D
Baby can't drink too much water! Well, maybe half a litre might be pushing it, but if they are to have 100-odd mL on top of their milk feed and solids, that's fine. Remembering too that bub will have thirsty days, just like you do.
There are many different cups, bottle etc out there and unfortunately it comes down to trial & error to see what will work for you & yours. If you've been feeding baby with a bottle, you know you have one avenue to try offering water through. You can always try a regular cup straight up. One tip is to use a cup in the bath as a toy. That way they get the notion of it & it doesn't matter if they get wet in the process! Try blowing bubbles in it and then letting them have a turn.
As with most things, it's monkey see monkey do. My girls both seemed very keen to drink from a pop-top water bottle like I use during the day. Come to think of it I rarely drink from a cup unless it's for a hot drink. My bad. I do like that, even though it's a little messy, I know I can always buy a pop top water bottle while we are out & Honey won't go thirsty. I also discovered that to get her to drink through a straw, all I had to do was stick my finger in her mouth, then slip the straw in next to it. She got the idea very quickly and now her favourite cup is a straw one.
When you look for a cup or bottle for your little one be mindful that a lot of the spill-proof ones need bub to 'bite down' on it before they can suck any liquid out. Not necessarily good for wear & tear on straws, but it's not like you can't get replacement parts for most things these days. Check out your mothers group, the park, or random kids in the shopping centre - if you see a product you think you might like, ask about it! You might even be able to have a cup swap meet and experiment with a different design for a week or so.

Phew! That was a lot more than I thought I'd write. Can you see why my posts are normally all about the pictures? It's so much easier to show you what I'm talking about :-) And speaking of which, here's a link to my Pinterest Board where I've been collecting all these fabulous info graphics.

I'd love to hear what you think of the series so far, and what you'd like to hear about next! Please feel free to leave a comment here, on social media, or drop me a line LovingLunches at gmail dot com.

Details of my tools & toys can be found on this page.
~J

Disclosure: This is not a sponsored post. This post was written for Loving Lunches. No product was received for this post. All opinions expressed are my own, based on personal experience with the product.

Pin It button on image hover