Have you heard about the latest trend to hit the party scene? Illooms are more than your average balloon, with a small LED light attached at the top which illuminates when activated, so you can literally light up your celebration!
There's something for everyone in the Illooms range which includes mixed colours, mixed girls colours, happy birthday, faces, multi-coloured marble, pink marble, flashing alien and flashing gnome. I was lucky enough to receive samples of all but have't tried them all out as yet. The girls have been happy enough with the few I've they've played with and these balloons last! The yellow one in this photo was inflated 4 days prior and while the light is now out, the balloon is still kicking along!
^That's where the light is! Thanks Honey for showing us :-)
That's what the Illooms plain mixed balloons are like. Cool, right? And easy enough to blow up which was good news for me!
The lights are meant to last up to 15 hours, but the first one I had seemed to turn off after a few hours. Every other one has been fine so I'm blaming gremlins!
These flashing gnomes were a little more difficult to inflate and the one I tried didn't flash. Perhaps it has to do with how they are sitting?
Miss M shows us how big they inflate to.
Loving:
The easy-pull tab for activating the LED light
LED light lasts for up to 15 hours!
Available in a variety of themes to help make your celebration memorable
The plain mixed Illooms were relatively easy to inflate. I would love to see how they go with machine inflation or helium!
They last inflated! So much longer than the regular balloons I have purchased in the past.
Available a major retailers Big W, Kmart and Woolworths
Illooms comply with global safety regulations and requirements
Loving a little less, but liveable:
My flashing gnome didn't flash, but it lit quite well and was still entertaining. I didn't try sitting it different positions too much etc. It was too quickly snavelled away by the munchkins!
The odd shaped gnome was difficult to inflate myself, as I find all odd shaped balloons. I'd love to see how these go with machine inflation or helium!
I'm not sure if the lights meant to react being tapped. This could be a good thing or a bad thing. Good for conserving battery life or toning down the light, but bad if you're in a mosh-pit and want a steady light ;-).
Price point could be a deterrent.
Overall:
I would certainly buy these for a special occasion, they are rather fun! I've already saved some of my samples for Miss M to have a day-time-disco with the best Aunty in the World for school holidays. I really Really want to see how these go with helium!!
Details of my tools & toys can be found on this page. ~J Disclosure: This is not a sponsored post. This post was written for Loving Lunches. No product was received for this post. All opinions expressed are my own, based on my personal experience with the product. This post may contain affiliate links.
Have you heard? One of my absolute favourite Bento Bloggers, Bento Monsters has released a book! I love Li's beautiful Bento style and have been a fan of her charaben works since I first discovered her. This is the lady who inspired me to use my wooden chopping board as a background for most of my lunches now. It cam from the crisp clean look of the photography on her blog, not to mention how fresh she makes everything look!
Li spent near on a year working on this incredible beginners Charaben Bento book. And the work has certainly paid off! Chock full of meal designs for all sort of serving ware (plates, bowls and various boxes) as well as recipes so you can complete the dish. The introductory section of the book is almost 20 pages long and covers everything from Bento tools & boxes through to creation and packing techniques. My favourite is the rice colouring guide!
I decided to try my hand at Tamagoyaki. And Honey decided to help!
You can never mix your eggs too much!
I didn't have any Mirin or a Tamagoyaki pan so made do with what I had.
I also couldn't find my sushi mat, but had this mini sized one tucked away.
Quite happy with my first attempt!
I ended up making three 'layers' due to the size of my pan but I think they worked just fine!
Then I decided to wrap them in ham and decorate as piggies just like one of the Charaben lunch boxes featured in Yummy Kawaii Bento.
I didn't hunt through all my tools to find the exact ones used in the book, opting instead for what was on top! Admittedly not quite as cute as in the book, but pretty darn close!
Then Miss M had a quick look through and asked for the clown lunch. I'm sure it was just so she could use my Mummy lunchbox, although the cherry tomato nose was also a big draw card.
But she wasn't happy when I told her the 'hair' was scrambled egg. It didn't take her long to let me know that she would be happy with scrambled egg whites instead. 'Just so long as there's no yolk, Mummy! And maybe you could colour it. . . like icing!!'
So I tried! I mixed some food colouring into an egg white and microwaved in 20 second blasts until I was happy with the consistency.
After it cooled I added it to the sandwich. I was worried the egg might make the sandwich a little soggy so I added a ham 'skull cap' to act as a barrier between them.
I carved some apple in checks as are featured in the book, but decided to do one with stripes like a circus tent which I placed on top. I also included some strawberry hearts, again featured throughout the book.
Overall I've got to say this is a brilliant Bento book and I can see lots of the ideas, techniques and recipes being put to good use! There are lots of lovely simple yet amazing ideas like this scrambled egg clown that are so easy to replicate. A great book for beginners through to advanced Bento Makers!
Details of my tools & toys can be found on this page. ~J Disclosure: This is not a sponsored post. This post was written for Loving Lunches & Bento Monsters who generously provided me with an e-copy of their book. All opinions expressed are my own, based on my personal experience with the product. This post may contain affiliate links.
Have you heard the buzz? There's a new Bento book on the shelves! I've loved Anna Adden's work over at Becoming a Bentoholic for some time now, and when the opportunity arose to review her new book Happy Bento!: Lunches on the Go I jumped at the chance.
Anna clearly & concisely walks you through the basics of Bento - from what it is and 'tools of the trade' to techniques to help you achieve the types of lunches pictured in her book. Basic Bentos, Fun Bentos, Special Days, and Season Bentos are all accompanied by crisp and colourful photos with each lunch detailing supplies, ingredients and directions. Where needed photo tutorials are also included. I love that this book covers everything from simple basic bentos and techniques through to somethings that are more advanced and complicated. Something for everyone!
I decided to replicate her Super Mario Bros inspired lunch, not only because it is so cute, but because I've been wanting to make one in my mushroom lunchbox ever since I got it!
I replaced the hotdogs in the book with corndog muffins as we've just been to the circus and I can't get that side-show staple Dagwood Dogs out of my head! Following the directions in the book made creating the Piranha Plant a breeze, although I used regular spaghetti instead of angel hair pasta and didn't cut the small circles from the plant which wold have made it that extra bit cuter.
I bought cherry tomatoes instead of grape but I still think they look quite cute, don't you?
I love this lunch so much I'm taking it to work for myself!
Details of my tools & toys can be found on this page. ~J Disclosure: This is not a sponsored post and no monetary compensation was offered nor provided. This post was written for Loving Lunches and Becoming a Bentoholic who provided an e-copy of the book to review. All opinions expressed are my own, based on my personal experience with the product. This post may contain affiliate links.
If you've been following on Instagram and reading the blog this week you may have noticed these clever little drink boxes popping up.
Boardwalk Imports was kind enough to send me two Juice in the Box containers, two Ice on the Box cooler sleeves and one spare parts set for Juice in the Box to review. Read through to the end of this post for details of how you could win a single Juice in the Box starter pack for yourself!
I took a video of the unpacking, but my microphone wasn't working very well :-(
What do you think? Pretty nifty right?
We've been using them to take all sort of drinks to school and daycare. Some of the things we've packed so far include iced tea, juice, homemade smoothies, homemade lemon cordial and milk. I love that we get to choose what goes in to the box and how much!
Well, up to the 240mL fill line anyway. Mind you, I don't think we've actually filled it to capacity any day. Depending on what's being packed I don't mind skimping a bit on the serving. Something more than water is a welcome relief come lunchtime in Queensland, even in the middle of winter! (Where is still gets to 26 degrees o.O)
Now, doing some quick Mummy-math, bear with me here. . .
Juice poppers (250mLx8pk = 2L juice) usually go on special for $3, thereabouts, right?
And the 1L tetra usually goes on special for $1
So right there you're saving 50c/L (or 12.5c/popper)! Without even considering changing the volume served, that saving's going to start stacking up after 40 weeks of 5 days at school!
Now let's try with milk. . .
I like to send the longlife plain milk poppers generally speaking, and they're about $3.50 for a 6 pack of 200mL (1.2L total = $2.91/L)
At home we have the $1/L full cream milk - check out that saving! Almost a third of the price! So if I were to send 200mL of our regular house milk in place of the poppers it would only take about 43 serves to save the cost of a Juice in the Box (RRP $17.95) Considering there are 50 days in a school term that's pretty good going I think! Not to mention the environmental impact or the health impact either!
Want to see how the size of the Juice in the Box stacks up against the poppers in my pantry? Check out this little YouTube video I made to help illustrate.
As you can see the Juice in the Box is a bit taller than your regular popper. If you're using a cooler bag this probably won't impact you much at all. If, however you tend to pack your juice box *inside* your lunchbox then you may run into some difficulties. As you know I have quite the selection of lunch boxes so I tried quite a few combinations trying to find the perfect fit. While it does squeeze into some boxes, there was only one that was a comfortable fit - the Nude Food Movers Lunch Pack. And it just so happens that Miss M asked for that box *every day* for the last week of school. Here's what she took those days:
And how it all packs into the box
Want to see how the Juice in the Box fits into your lunchbox? I may have a version amongst the collection I tested.
But what about those days when you're not accessing a fridge like my girls? Well, Miss M has had holiday school this past week while I've been working and she was more than happy to test run the Ice on the Box for me! For her first day I actually froze the Juice in the Box as well as the Ice on the Box, and sent her lunch with a frozen yoghurt pouch as well in a cooler bag. The yoghurt and juice were still mostly frozen at lunch time! Oops! Since then I've sent the frozen Ice on the Box and frozen yoghurt pouch with refrigerate juice and other lunch contents in an insulated bag. This seems to be the perfect combination for her.
So, time for the nitty gritty of the review!
Loving:
Easy clean (dishwasher safe, although I don't own one to test that - hint hint Santa!) A bottle brush works well
Easy click open - even Honey (not quite 2) can open by herself
Versatile when it comes to what and how much you choose to pack
Leakproof (with the lid closed, although Honey did make off with her full JIB one day and I found it laying on it's side, lid open, half empty - and not leaking!)
Translucent body so you can see what's left inside (including any nasties)
Too tall for my most commonly used boxes. This isn't generally an issue when using cooler bags or lunch bags
The price can feel a bit expensive at first, but in the long run it is certainly justifiable.
Now everyone wants one!!
Overall:
I have always sent a drink along with water with my girls every day and it's something I intend to continue with. I can definitely see our Juice in the Box getting quite the work out! I would like to see a shorter version that will fit into my lunch boxes, but it won't be long and we will be out of the classrooms with fridge access so will be using cooler bags anyway. I love Love LOVE being able to choose what and how much to pack into these drink boxes. It means healthier choices and less waste, which means a happier Mummy!
Now for the fun part! You can win a Juice in the Box starter bundle for yourself! Boardwalk Imports is kindly giving away 4 - yes FOUR Juice in the Box starter kits, which include a Juice in the Box Ice on the Box, and a Replacement parts pack. Just follow the instructions on the Rafflecopter form below and make sure you complete all the mandatory criteria for your entry to be valid! The 'bonus' entries don't actually count as this is a game of skill, however I've included them as an easy option for following :-)
As per Terms & Conditions you must complete all three mandatory entries to be eligible to win. It is highly recommended that you enter the giveaway with the same email address/ID you follow with, otherwise your entry can be difficult to verify.
Details of my tools & toys can be found on this page. ~J Disclosure: This is not a sponsored post and no monetary compensation was provided nor offered. This post was written for Loving Lunches and Boardwalk Imports who generously supplied me with a sample to review and the prize/s for this giveaway. All opinions expressed are my own, based on my personal experience with the product. This post may contain affiliate links.
Have you decided what sort of lunchbox you are going to send to school/work/uni this year? I'm still undecided as Miss M will be heading to Prep and the lunch routine will be a little different from her Kindergarten and day care days. It's not like I don't have an array to choose from, but I'm always on the look out for that one-perfect-for-everything box. You can check out some of my collection in my Lunchbox Line Up and Lunch Box Experiment posts.
I asked my friend, and reason this blog got started, Anna about her latest lunchbox. You can read more of her work over at Frugally Fabulous! Welcome Anna!
We (well, the kids) just got new lunchboxes! We'd (I'd) been coveting these for a while now. With B starting Kindergarten in two weeks, I thought we'd better go for something with a better seal since it could get bundled around in his backpack. And of course, it would have been a great injustice for L to not have a new matching lunchbox in her favorite color.
I decided on the Pottery Barn Kids Spencer Bento Box containers based on the recommendation of a friend (and mom of a newly graduated Kindergartener). So far I really like it, and the kids do too.
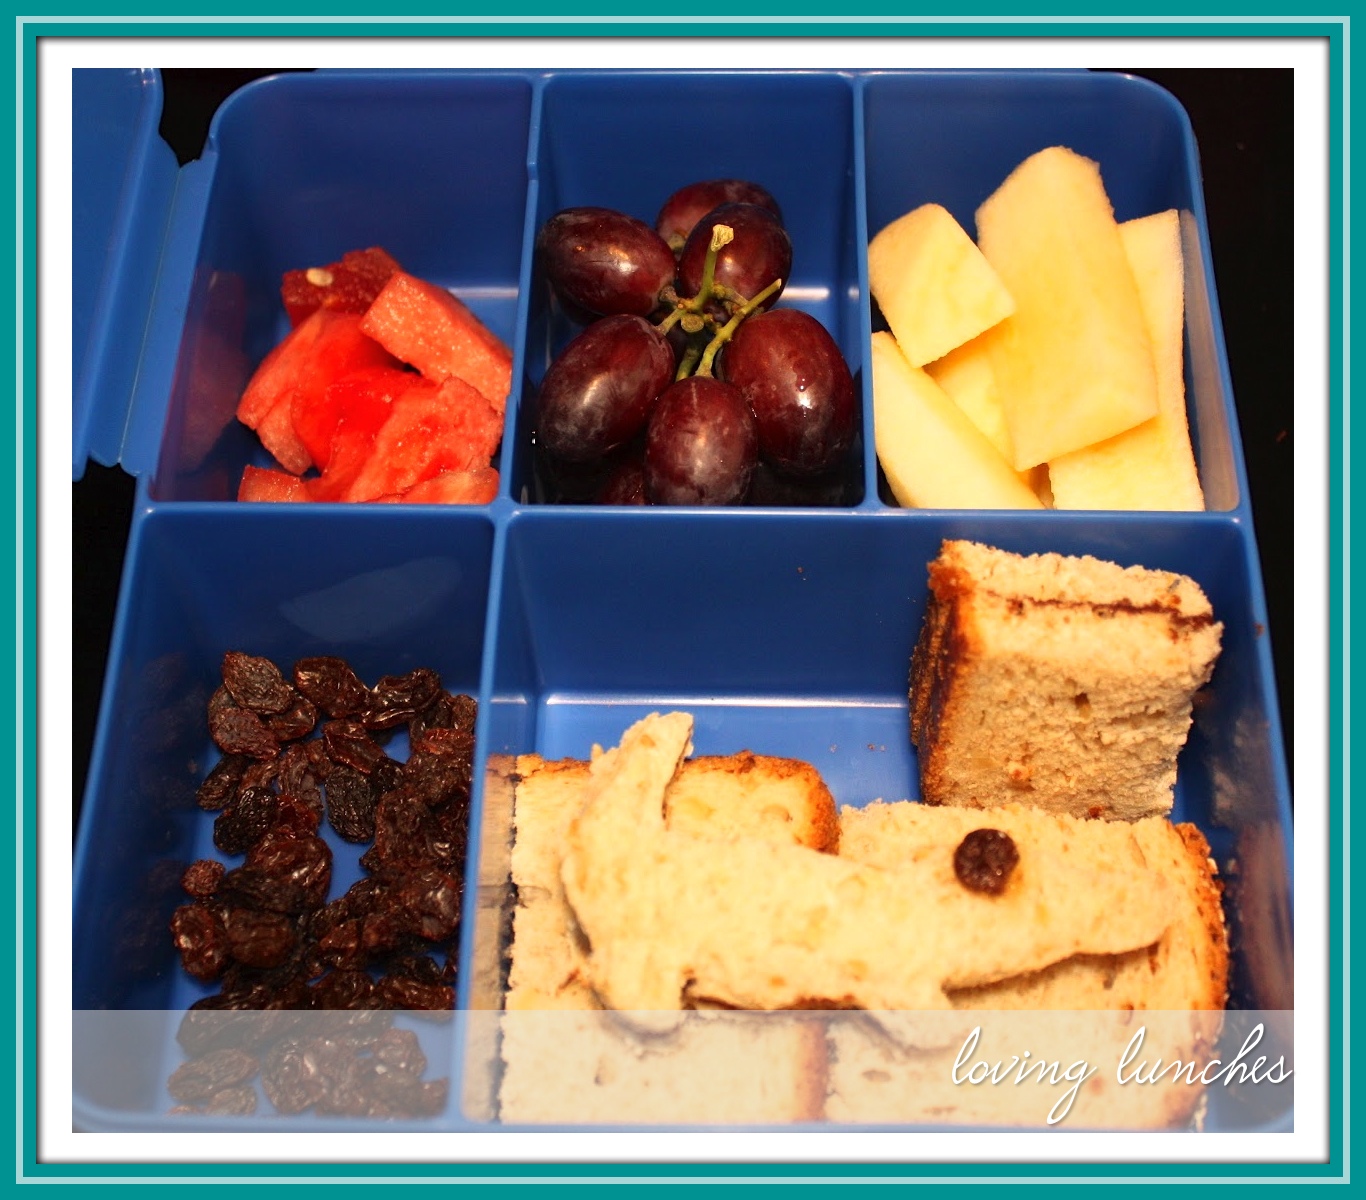
Ease of use for 2 yr old - 10/10 Ease of use for 5 yr old - 10/10 Sandwich size compartment - No, but I always cut the sandwiches anyway. It fits an entire cut sandwich in the big compartment. Dishwasher safe - Yes, top rack only, but in truth it takes up too much room - two of these babies pretty much fill the top rack of my dishwasher so I'm hand washing them. Compartments - 5 - honestly, I found it a little overwhelming working out how to fill that many compartments - I am going to order some bento picks so I can put one of those and a couple of antibacterial hand wipes in one section - I think I can handle four foods in a lunchbox! Lids - Attached - Hooray, no looking for lids! The downside is they don't fit in the dishwasher easily because the lids don't detach. Leaks - No! Haven't tried with yogurt yet but the watermelon in the small lidded section did not leak! L was able to close it herself and drop it repeatedly in the car with no spills! Price - $US16.50 (Now available in Australia, check this link for details)
UPDATE:
We christened the kids' new lunchboxes today, and I couldn't help but add a little extra fun!
It's literally taken years of negotiation with B to agree on square-shaped sandwiches. With hesitation I decided to take a leaf out of Jackie's book and put my crocodile cookie cutter to use. Since B also now FINALLY eats crusts, I decided not to rock the boat too much. I made two identical sandwiches and cut just one crocodile for each child from one sandwich and cut the rest of that sandwich into two small squares. The second sandwich was cut into four squares, so each child ended up with three small squares and a crocodile.
Watermelon; Red seedless grapes, Apple slices, Raisins, Nutella sandwiches (3 square, 1 croc)
I decided the crocodile didn't look all that crocodile-ish, so I added a raisin eye (I put a tiny bit of honey on the bread first so it would stick).
Sadly, B liked the little croc too much to eat him at lunchtime while I was in my gym class. He said he wanted to photograph him first. I assured him that I had already taken a photo for the blog. He ate the little croc later in the afternoon.
Disclaimer: I was not paid for this review. I received the lunchboxes as a gift from a friend as a thank you for looking after her 2 year old twin daughters for a day!
-- A
Disclosure: This is not a sponsored post. This post was written for Loving Lunches. No product was received for this post. All opinions expressed are the author's, based on their personal experience with the product.
I have a little problem with Flashback Friday this week. . . I can't remember the result of my experiment! I know this was last year in the lead up to Christmas and I only thought of these photos after finding some of these cuttings in the back of the freezer the other day (perfect for pizza toppings by the way). I do remember I used a red capsicum, and have since learned thanks to Wendolonia that it is much easier to use a cutter once you have *peeled the capsicum*! Of course, why didn't I think of that!
These little sausage deco cutters worked but I'm sure it's these that ended up giving me my first bento injury - death by paper cut!
Vegetable cutters - designed to do the work.
A selection from my Create-A-Shape pack. My go to, favourite pack.
You can see some of the edges are a little ragged across the board, but if I'd known about that peeling trick things might have turned out differently. Live and learn!
Details of my tools & toys can be found on this page. ~J Disclosure: This is not a sponsored post. This post was written for Loving Lunches. No product was received for this post. All opinions expressed are my own, based on my personal experience with the product. This post may contain affiliate links.
Are you enjoying your holidays? We're having a great time, and although I'd love to say I got to go shopping for these goodies myself, alas I had to send my personal shopper (thanks Sis!)
Some cutlery for next year (Miss M will have to take her own cutlery to prep)
More cutlery for next year.
Gorgeous little heart picks - I'm thinking Valentine's already!
And a little music to brighten your day :-)
I actually requested these thinking I would use them for Honey's Teddy Bear Picnic birthday party, but had too many ideas, and not enough time :-)
Oh the wonders of a growing collection!
Details of my tools & toys can be found on this page. ~J Disclosure: This is not a sponsored post. This post was written for Loving Lunches. No product was received for this post. All opinions expressed are my own, based on my personal experience with the product.


