Pages

Wednesday, 31 October 2012

Halloween Cook Up

I apologise in advance for the lengthy post - my creativity got away on me :-)

I was asked to do some baking for work to help celebrate Halloween, and I did some for daycare too while I was at it - Thanks to Pinterest, here is what I came up with:


Cut the curve off some candy-canes. . .


 . . . pop the curves into a blender. . .


. . . blend to a powder. . .


. . . and bake into patty cakes.


My first batch did not work out well. . .


And you can see how much the second batch sunk as well - I'm blaming the candy canes as I used my favourite basic cake recipe.


 The chocolate ones worked out much better. I flavoured them with some peppermint essence & peppermint chocolate bar


Moving on to decorating. . .
Mint Slice + christmas bells. . .


Looks more like a pilgrim hat than a witches' hat. . .


And chocolate covered meringues didn't really work out how I'd planned. . .


and when paired with a Chocolate Wheaten is supposed to look a little like a witches hat. . .


Those candy canes from earlier, plus some jelly beans. . .


And some 2-tone icing. . .

Witch in a Ditch cakes


These are the 'vanilla/mint' with the mint slice hats


I'm a bit proud of the decorating


The chocolate 2-tone icing


Again - just a tad proud


The choc-mint with the choc wheaten/meringue hats


 In all the excitement I forgot to take a photo today so please excuse the terrible lighting


I decided I'd send the excess to daycare but ran out of candy-cane legs, so I improvised & used some Arnott's TeeVee Malt sticks with bananas cut in half for the shoes


Not as nice as the jelly beans, but I'm sure the kids will enjoy them anyway :-)


While we're on witches, I made some broomsticks for them. . .


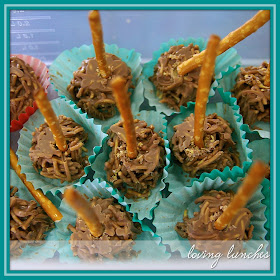
These are Chang's spiders (noodles in melted chocolate) moulded in a mini-muffin tin with a pretzel handle. In retrospect it would have been easier to put the handle in before I set the chocolate in the fridge, but I wanted the 'skinny' end of the spider at the top


And here are the Reese Peanut Butter Cup version. I was lucky enough to spot a pack of these in the cheap shop the other day so I grabbed them with this in mind


These are also being split between work & daycare - jelly eyeballs. . .


 Well, that's what they're supposed to be anyway. I think they would have worked much better in a different mould, but I only had my mini-muffin tray which gave a rather square finish to the edge


I was going to do some of these edible spider webs for both daycare & work, but these will only be going to daycare


I realise now that I forgot to give the spider legs. . it must be one of those tricky pouncing ones & his legs are tucked underneath him ready to go :-)


I ran out of room in the fridge to let these set properly (they are actually quite large when assembled)


So I left them on the bench & while the chocolate has set, it hasn't set as hard as I would have liked. I ended up cutting the paper under each spider & popping them paper & all into the storage box for the big day


Last one!

I've been racking my brain (and Google) trying to find a biscuit recipe that's egg-free & nut-free so a little boy in Miss M's daycare class doesn't have to miss out on the goodies I make. Then I came across my old scone recipe - egg & nut free!


I had originally planned to do gingerbread men skeletons for daycare & then do voodoo doll versions for work, but ended up adding pumpkin to the scone recipe & attempting a more Jack-O-Lantern inspired creation. . .


I tried with a choc melt mouth


and a coloured nose .. . .


and no nose. I think they're a bit cute for Halloween, but I didn't want anything scary for the little ones.


I do love discovering I can do scones in my Kambrook doughnut maker though!

I haven't linked to all the ingredients like I usually do. If there are any you'd like further information on please let me know & I'll forward the links through


Thank you for supporting me through Blogtoberfest - it's been a big one! I'm now planning on a few days off from blogging, but will be back next week with our NEXT GIVEAWAY!!

Don't forget to enter my Decor Tellfresh Quarters Giveaway! All you have to do is answer a question & follow me on at least one social media (or email). And you can do this everyday to increase your chances of having your answer chosen as best. Good luck :-)
LAST DAY!!!

Thank you for celebrating Blogtoberfest with me. Don't forget to check out some of the other great bloggers participating by clicking on the button in the sidebar.

~J

Disclosure: This is not a sponsored post. This post was written for Loving Lunches. No product was received for this post.


Tuesday, 30 October 2012

Halloween Lunch

 I did Halloween lunch a day early this year as I knew how busy I would be baking on Halloween 'Eve'

Here I dug out a witch biscuit cutter. I topped out regular ham & cheese sandwich with an extra slice of cheese & a Burgen Rye witch.


Served in Tupperware square rounds


Babybel Cheese sort-of-kind-of, if you squint carved like a Jack-O-Lantern using the mini shapes in the set below


Thank you Pinterest for this idea


I used food picks to hold circles of bread (off cuts from the sand-witch (sorry, couldn't help myself) above) and some cherry tomatoes


I struggled with what to use as a house so I decided to cut up a sausage from dinner & tell Miss M it's  log cabin :)


When I asked Miss M if she wanted a sauce container in her lunch she said no - good girl.

I thought the hat looked better here, so. . .


I made a broom out of a pretzel & a crust off-cut


Snack was cheese & Pepperoni from Walkerston Country Meats again 'carved' like Jack-O-Lanterns. Served with rice crackers


The Fruit I'd planned to change the apple offcuts into the orange & the orange offcuts into the apple, but I tunes out & ate the apple offcuts as I was going - oops!


I realise this seems a lot for a 2.5 year old but honestly the only thing left in her lunchbox this afternoon was the babybel & the apple - which she asked to eat as soon as she got home. I am blessed with a great eater :-)

Things I used to make this lunch


Don't forget to enter my Decor Tellfresh Quarters Giveaway! All you have to do is answer a question & follow me on at least one social media (or email). And you can do this everyday to increase your chances of having your answer chosen as best. Closes 31st October!!! Good luck :-)

Thank you for celebrating Blogtoberfest with me. Don't forget to check out some of the other great bloggers participating by clicking on the button in the sidebar.

~J

Disclosure: This is not a sponsored post. This post was written for Loving Lunches. No product was received for this post.


Monday, 29 October 2012

Pocket Sandwich Cutter Tutorial


I bought this little guy from Affiliate Neat 2 Eat thinking it would be brilliant for gooey things like chicken & mayo mix; spaghetti bolognaise; tuna and so on, but to date I've only tried it on ham & cheese or jam :-)


The first few times I tried it on the ham & cheese I was a bit disappointed that the edges tore, but Miss M ate 2 sandwiches instead of her usual 1 so I shouldn't argue. I then dug around to find a tutorial to see if maybe I was missing a trick - I was.


I learned that you're better off to keep the filling within the boundaries rather than just making your sandwich & cutting away like I normally do


Use the large piece to make a mark on the bread so you know where to fill to


Then you take both pieces . . .


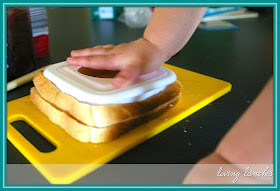
 . . . and press down


Give it a wiggle (or your assistant my help with that)


Ensure you've cut all the way through


Remove the centre section (I don't know why looking at the packaging I thought this would actually produce a heart shaped sandwich - it does produce a square sandwich)


You can see this edge has started to tear a little


And this side too


 But still a quick way to cut the crusts off & gives you a standard size to work with

This is what we took out this day in our Decor Quarters

*Mini M&M biscuits (we packet-baked)
*pocket sandwich (notice it actually fits in neatly now - that's a bonus)
*blueberry food sticks
*sliced cheese stick with sultanas & craisins on food sticks
* and a Little Bellies Choo-Choo Bar


Overall I can't say I'm super impressed with the cutter, especially I now know you can achieve the same 'pocket' result with 2 sizes of the same design biscuit cutter (I'll show you that too). I may change my mind when I get around to trying messier fillings, but until then I'd say spend your $6.95 on a set of graded biscuit cutters.

Things I used to make this lunch


Don't forget to enter my Decor Tellfresh Quarters Giveaway! All you have to do is answer a question & follow me on at least one social media (or email). And you can do this everyday to increase your chances of having your answer chosen as best. Competition closes 31st August, 3pm! Good luck :-)

Thank you for celebrating Blogtoberfest with me. Don't forget to check out some of the other great bloggers participating by clicking on the button in the sidebar.

~J

Disclosure: This is not a sponsored post. This post was written for Loving Lunches. No product was received for this post. All opinions expressed are my own, based on personal experience with the product.